Success on the 1st project of 2015!

I’m pretty excited to share this, I have 2 new sprouts on the potato that I planted a few weeks back!
****HAPPY DANCE!!! (Yes the QVC Host David is rubbing off on me)
The next project I will be tackling is starting my garden from seeds. I usually start my seedlings around this time so they are ready for the big planting day that usually happens mid may for me.
I will be starting tomatoes, pumpkins and peppers. I think I will save the space this year and not plant cucumbers since they did not do so well last few years.
There truly is nothing better than a fresh picked tomato to enjoy in the summertime.
What are you planting this year??

2015/01/img_4099.jpg

The New Year.. New Projects..

The other day I was asked what my New Years Resolutions were and I honestly had no answer. By no means am I perfect, there are some things I could really work on . For my 2014 resolutions I wanted to lose weight and live a healthier lifestyle. Well I’m proud to say I’m down 30 pounds and four pants sizes (now if only Moose could lose his 8 pounds). To live a healthier lifestyle, I took on cooking more and eating out less.

What are your New Years Resolutions?

I have not nailed down all my 2015 resolutions yet, I figured I still have a few days left, but In the coming year I wanted to try and take on new projects to challenge myself. My latest project, I started two weeks ago. I started growing potatoes in a 5 gallon bucket in my basement. I got the idea from pinterest from people who were tired of wasting potatoes that sprouted.
I bought a bag of blue potatoes a few months ago and some how they got lost in my pantry. Moose my over curious dog found this missing bag of potatoes and brought them out to play with. When I was finally able to take his new play things away, I noticed the potatoes were filled with sprouts and tiny tubers were coming from the sprouts. Since I have my own library of gardening books, I found that the small tubers could be planted. I then went on Pinterest and found how to grow potatoes in a bucket.  All you need for this fairly easy project is a 5 gallon bucket, a sunny window or grow light, a small layer of compost, and a small layer of dirt to put the potato in. Each week you will be putting a new layer of dirt  over your growing potato sprout. Don’t forget to water the sprout every few days. I’m really excited about this project since blue potatoes are fairly hard to find at the stores and if you are able to find them they are pretty pricey.

Any New Years Projects in the Works?


/home/wpcom/public_html/wp-content/blogs.dir/bbd/66390839/files/2014/12/img_4006.jpg
A snapshot of my blue sprout

Garlic Scapes

002

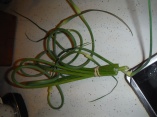
Last year around this time my good friend Karin Fry introduced me to the Garlic Scape. Of course after she told me about this my curiosity was peeked, so my mom and I went off to the Royal Oak Farmers Market in search of this new ingredient. The garlic scape is the top “flowering” part of the garlic plant. To me it has a more potent garlic flavor than the actual bulb.

At first, all I did was just add them to my salads. I personally thought it was better than adding an onion. I chopped them up and use them as I would a scallion or chive. It gives your dish a huge burst of garlic flavor with out all the work of peeling garlic out of a bulb.

A few weeks after this discovery, I went back to the market to get another bunch. To my surprise they were no where to be found. I found out they are only out for a few short weeks in June. This year I found them at Eastern Market and The Royal Oak Farmers Market. They sell for around $2.00 a bunch. I was smarter this year and I stocked up.

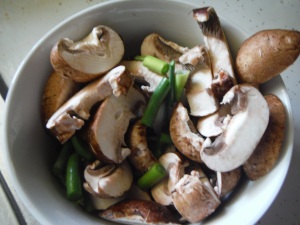
What did I do with this years bounty you ask?  Well I found  that they are amazing sautéed with mushrooms in a little bit of coconut oil. (Coconut oil is also a new thing I started to cook with. It has been taking the health food world by storm since it can be an aide in weight loss and has various other benefits.) I made a pesto out of them, that was like a full garlic explosion for pasta that might be even better than the basil pesto.  I plan on adding them to my pickle recipe and I may toss them into my salsa. I also ended up freezing a few bunches so I can use them when winter comes (because sadly its coming, not to sound like a character from game of thrones). Freezing is super easy just wash them up toss them into a Ziploc bag then put into your freezer.

001

Here is the Garlic Scape pesto recipe:

6-8 Garlic scapes chopped, **3/4 cup of olive oil, 1/4 cup pine nuts or walnuts, 1 cup parmesan cheese (grated) 1 tbsp. lemon juice, salt and pepper to taste.

Add all ingredients to a food processor and blend till smooth.

** For the olive oil I used regular for one batch and then I used a basil infused olive oil for a different flavor. Experiment with what ever flavor you like.

I ended up freezing a few batches of my pesto so I could have it later on.
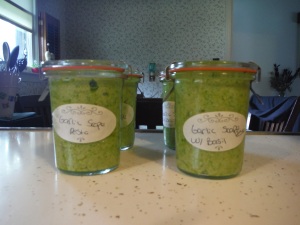
007

Until next time 🙂

First Post.. First Project..

Thanks for reading my first ever blog post!  For anyone who is reading this and does not know me, I’m Laura from Michigan! I love MSU the Tigers, gardening and cooking. Like most Michiganders this year I pined for spring. I spent lots of time watching TV, plotting out my garden and starting seedlings in the basement. When the great thaw did come and it was time to survey the yard, I was very happy to find a good majority of my plants survived the harsh winter.

*My first garden harvest project for this year is Chive blossom vinegar.

There is nothing like an awesome salad (yes I admit I grow my own lettuce) with oil and vinegar. There are so many different flavors of oil and vinegar that it is fun trying to find that right mix to rock your taste buds.

I found an article one day on how to make chive flavored vinegar and I was pleasantly surprised how good it was with a little olive oil on a salad. I’m sure you could try a flavored olive oil with it but I haven’t gotten that creative yet.

Here is how to make your own Chive vinegar:

Pick about 1/2 of a cup of purple chive blossoms (a cup if you really like the chive flavor like me). Wash these in a strainer thoroughly to make sure you get all the dirt off and any hitchhikers that may have come along. I usually rinse really good once, leave in the strainer and come back a little later for another rinsing.  Once you are done with that put the flowers in a jar, pour about two cups of vinegar on the flowers and seal it up. Hide your jar away in a dark cool place for a few weeks.

Once time has passed you will have to strain the flowers from the vinegar and place the vinegar in a new jar. Then Enjoy!

Until Next time 🙂

Image